[자료구조] Abstract Data Types 과 C++ Classes
자료구조
Abstract Data Types 과 C++ Classes
이번 포스트에서는 객체 지향 프로그래밍을 소개한다. OOP는 새로운 데이터 유형의 생성과 이러한 유형을 조작하는 작업을 지원하는 프로그래밍에 대한 비교적 새로운 접근 방식이다.
Thinking Cap
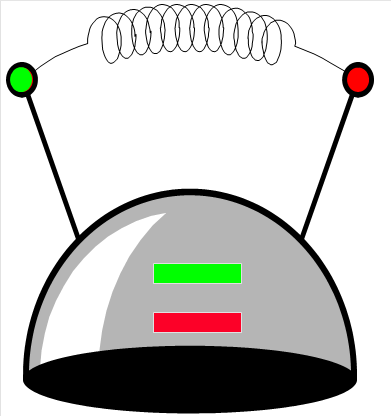
“Thinking cap”이라는 예시를 통해서 객체지향 프로그래밍을 소개한다.
-
이 생각모자는 두개의 슬롯(초록색과 빨간색) 각각에 문장이 적힌 종이를 넣을 수 있다.
-
초록색 버튼을 누르면 생각하는 모자가 녹색 슬롯의 종이에 있는 문장을 말한다.
-
빨간 버튼도 마찬가지다.
-
서로다른 메시지를 버튼에 넣어 버튼을 누르면 해당 버튼에 넣은 메시지를 출력하는 프로세스다.
c++ class
Class 기능을 사용해서 c++에서 “Thinking Cap”을 구현할 것이다.
Class = Data + Member Funtions
class ThinkingCap
{
	public:
		void slots(char new_green[ ], char new_red[ ]);
		//char은 1-byte의 변수다.
    void push_green( ) const;
		//const는 저장된 데이터를 변경하지 않는다는 뜻
    void push_red( ) const;
	private:
     char green_string[50];
     char red_string[50];
};
-
Public 멤버는 class 외부에서 접근할 수 있는 변수를 의미
-
Private 멤버는 class 외부에서 접근할 수 없는 변수를 의미
Thinking Cap 클래스 정의는 .h파일에 배치되며 함수의 구현은 .cpp파일에 배치된다. cpp파일의 구성은 다음과 같다.
#include <iostream>
#include <cstdlib>
#include <cstring>
#include <cassert>
#include "thinker.h“

using namespace std;

int main( )
{
    ThinkingCap student:
    ThinkingCap fan;
    student.slots( "Hello",  "Goodbye");
    fan.slots( "Go!", "Boo!");
    student.push_green( );
    fan.push_green( );
    student.push_red( );
- 먼저 위의 헤더파일을 포함해 여러 파일을 포함시킨다.
- 메인함수에서 ThinkingCap 객체를 선언한다.
- 객체 뒤에 마침표를 쓰고 활성화하려는 멤버 함수의 이름이 있다.
- 첫번째 인자(new_green)과 두번째 인자(new_red)를 설정한다.
- 마찬가지로 설정하고 push를 통해 출력
- 출력값은 Hello, Go!, Boo!임을 알 수 있다.
slots, push 함수 구현
slots
void ThinkingCap::slots(char new_green[ ], char new_red[ ])
{
	assert(strlen(new_green) < 50);
	assert(strlen(new_red) < 50);
	strcpy(green_string,  new_green);
	strcpy(red_string, new_red);
}
push_green
void ThinkingCap::push_green( )
{
  cout << green_string << endl;
}
push_red
void ThinkingCap::push_red( )
{
  cout << red_string << endl;
}
Default Argument
따로 지정되지 않았을 때 적용되는 기본 인자다.
예시
int date_check(int year, int month=1, int day=1) ;

date_check(2000) ;  // same as date_check(2000,1,1)
date_check(2000,7) ; // same as date_check(2000,7,1)
Value parameter
값 메게변수로 실제 인자의 값이 formal 매개변수로 전달됩니다.
void  swap(int a, int b)
{    int  temp = a;
     a = b ;
     b = temp ;
}
…
x=1; y=0;
swap(x,y) ;
cout << x << endl;
cout << y << endl;
다음은 간단한 swap 예제다. Value parameter기 때문에 출력값을 확인하면 1, 0으로 출력된다.
Reference parameter
함수 본문 내에서 참조 매개변수를 사용하면 호출 프로그램의 인수에 엑세스한다.
void  swap(int& a, int& b)
{    int  temp = a;
     a = b ;
     b = temp ;
}
…
x=1; y=0;
swap(x,y) ;
cout << x << endl;
cout << y << endl;
위 예제와 같은 예제로 첫줄에 &를 표시해서 레퍼런스 파라미터를 지정한다. 이 경우에는 0, 1로 바꿔서 출력된다.
Const Reference parameter
참조 매개변수와 동일하지만 함수 호출 후 매개변수 값이 변경되지 않도록 한다.
int  sumOfSquare(const int& a, const  int& b)
{
     return a*a + b*b ;
}
…
x=1; y=0;
int i = sumOfSquare(x,y) ;
cout << x << endl;
cout << y << endl;
const를 사용했기 때문에 출력값은 1, 0으로 함수가 적용되지 않고 나온다.
각 파미터의 특징
언제 value, reference, const를 쓰는가?
- reference : 실제 파라미터 값을 함수가 수정하고 싶을때
액츄얼 파라미터 값을 변경하지 않고싶을때는 나머지를 사용한다.
-
value : 기초적인 파라미터 즉 데이터가 작을때는 벨류파라미터를 사용
-
const reference : 액츄얼 파라미터의 데이터가 클 경우
Operator Overloading
더하기 빼기 등등, 오퍼레이터를 정의해준다. 아래 예시는 p1과 p2를 받아 비교해주는 오퍼래이터를 정의한 것이다.
Example:

bool  operator ==(const  point&  p1, const point& p2)
// postcondition: The value returned is true if p1 and p2 are
//                            identical. Otherwise, false is returned.
{
     return (p1.get_x() == p2.get_x() ) &&
	    (p1.get_y() == p2.get_y() ) ;
}

bool  operator !=(const  point&  p1, const point& p2)
// postcondition: The value returned is true
// if p1 and p2 are not identical. Otherwise, false is returned.
{
     return !(p1 == p2) ;
}
댓글남기기